Tuesday 28 October 2014

Mendel90 with e3d v6 hotend

The next generation (version 2) of the Lasercut Mendel90 is a work in progress. Currently we are planning on having from 1 to 5 bowden extruders to allow for a single extruder printer as a starting point that is then easily upgradable to as many extruders as required. I will post more information as I finalise the design, for now I wanted to share a X carriage, hotend mount and modified print cooling fan to fit an E3D V6 bowden hotend.

e3d V6 1.75mm bowden hotend mounted on a Lasercut Mendel90, view from below without the print cooling fan
Hotend mount

The hotend mount is designed to accommodate Nophead's ribbon cable connection PCB. 


The e3d v6 fits snugly into a groove mount.


After assembly:


Modified X Carriage

This X_Carriage is a further development on the one made for the Kraken hotend, in fact it was designed to allow the V6 and Kraken to be swapped out without dismounting the carriage. Unfortunately the Kraken is too large for that however at least only one carriage design is required for both.


With the V6 from above


and the Kraken from below


Modified Print Cooling Fan Duct

The V6 is too big for the original fan duct, also this method of mounting places the print tip almost in the center of the carriage. I redesigned the fan duct to take this into account:


I am interested to see how well this design operates "in the wild", I think it may be time to move to bowden in most applcations as a stepping stone to multi material and multi colour printing.

As always Think3dPrint3d designs are open hardware. The design files are available on github and as a Youmagine design.

Follow this blog or @Think3dPrint3d to be alerted to further developments! 


Monday 20 October 2014

PanelOne on Sanguinololu

The PanelOne LCD display and control panel was originally designed for RAMPS1.4, and that is still the most sensible way to use it as it uses two 2x5 IDC cables that are readily available. The PanelOne circuit board is designed to work with 3.3V and 5V electronics and this weekend I tested it with Sanguinololu (effectively going full circle back to the original Panelolu - just a lot easier to put together and use!)


This works fine, although you do need to be careful to plug the pins in correctly:


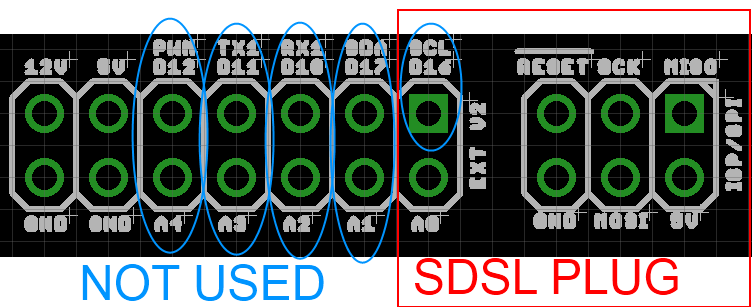
The correct pins for Sanguinololu are:

Wire number    PanelOne             Sanguinololu
                         Aux2
1                       5V                         5V
2                       GND                     GND
3                       EN B                     Rx1
4                       EN A                     Tx1
5                       LCD DB7              A4
6                       LCD RS                PWM
7                       LCD DB6              A3
8                       LCD E                  SDA
9                       LCD DB5              A2
10                     LCD DB4              A1
                         Aux3
1 Not Connected
2 Not Connected
3                       CS                        A0
4                       CLK                      SCK
5                       DO                        MOSI
6                       DI                          MISO
7                       EN SW                  SCL
8                       VCC                      5V
9 Not Connected
10 Not Connected

This blog post has a good image of the location of each pin on the Sanguinololu, re-posted below:

The IDC cables are numbered with wire 1 being the red coloured wire.

This will work out the box with the T3P3 version of Marlin by enabling #SDSUPPORT and #ULTIMAKERCONTROLLER in configuration.h

The process followed can be adapted to use the PanelOne on any electronics that runs Marlin and has enough free pins. Do let me know if you get it working on another board!